

This was the first lab in a while that I didn’t have to look up any hints to complete it and it wasn’t that easy either. I followed my normal procedure of recon and enumeration and after a bit of digging found the path towards escalation.
When I first saw “Cap”, I thought of PCAP files but dismissed it as I thought that was too easy and had no idea how that would play into a lab. I was presently surprised by how wrong I was.

PCAP files are network packet capture files that can be collected with tools such as Wireshark and tcpdump. Both tools can be found on any typical Kali OS so you shouldn’t have to install them. I typically utilize Wireshark for its GUI and readability. Having been studying for the CompTIA Network+ exam, it has been a pretty widely used tool for my studies and I would recommend anyone to try it out.
So back to PCAP files. Essentially, PCAP files are copies of the packets sent throughout a network connection. These are conveniently displayed in an easy-to-read format for users that I’ll show an example of further down the post. These packets can usually be recovered over a LAN that you would have access to and include information such as sender, receiver, flags, and data.
Normally, this data would be encoded if we were using such services as HTTPS or SSH, so actually being able to read any of the data in a packet would be an extremely difficult and time-consuming process for a malicious actor.
In the case of this lab though, we will be given access to an unsecured form of communication and will need to leverage that for access. So let’s go ahead and begin. As always, if you are interested in seeing my original notes for this lab, here is the link.
Reconnaissance
I changed my normal strategy as of late to mainly focus on passive reconnaissance first. I’d usually start with an NMAP scan to see what ports were available but this time opted to stay silent and jump immediately to a web browser to see what would pop up.
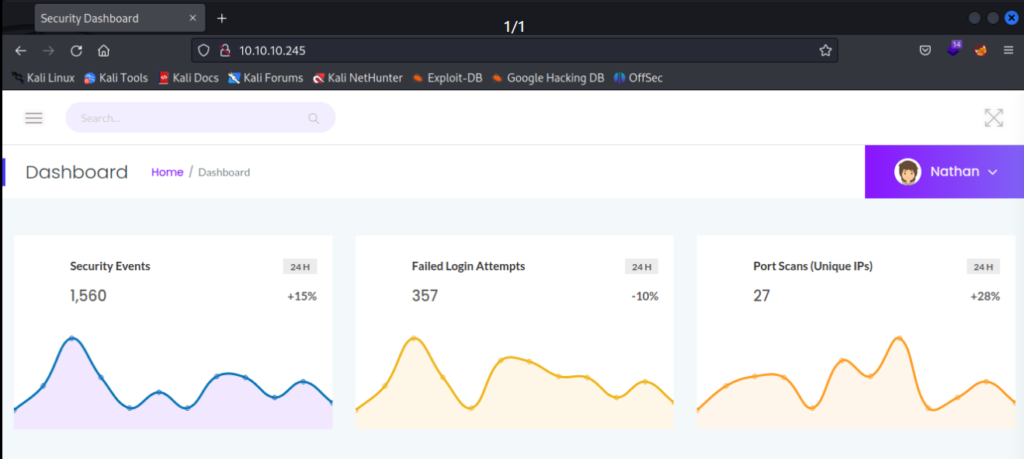
Right off the bat, we now know that port 80 is open and is serving a data analytics page. If you jump over to the hamburger menu in the upper left-hand corner you find a list of convenient tools available to you to use.
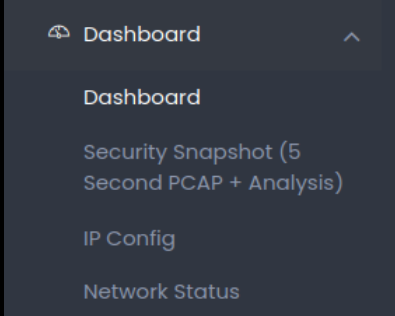
If we click on the Security Snapshot (5 Second PCAP + Analysis) link, we’ll notice a pause in the operation. This will be approximately 5 seconds long and is actually capturing data packets over the LAN and creating a PCAP file for us.
There is a button at the bottom that will allow you to download the PCAP file but what we are interested in is the URL link above with a subdirectory listed as 1.
http://[TARGET IP]/data/1If you start another capture, you’ll notice the URL will change to a 2. Let’s go ahead and change that URL to list out a subdirectory of 0 instead.
http://[TARGET IP]/data/0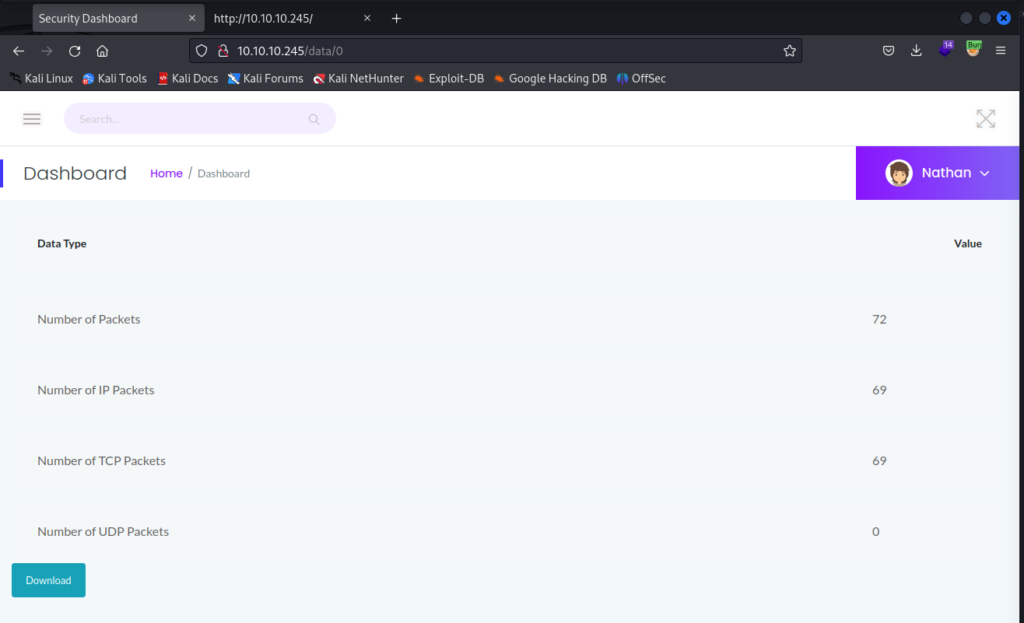
It looks like someone had previously done a capture and we now have access to that information. Let’s go ahead and download the PCAP file with the Download button at the bottom of the page and open it up in Wireshark.
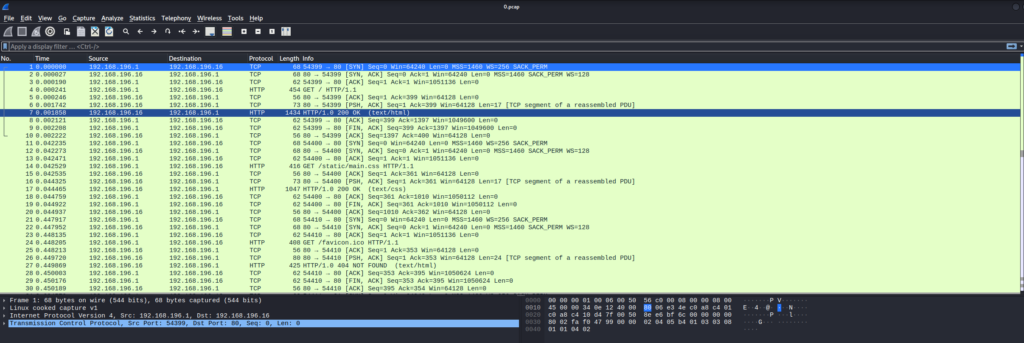
It looks like standard packet capture data but let’s scroll through it to see if we can find anything of use.

Not too far down the list, we will see that a user named nathan has logged into the FTP service for the machine while running this packet capture. Recall how I mentioned that most of the time, packet capture data is useless as it will be encrypted. Well, the FTP service is one of many services that does not encrypt its data and transmits data as clear text. In most LAN, this isn’t necessarily bad but it’s not good either.
All it takes is one bad apple in your network to be listening in and they can grab all of your data. Including, your login credentials. In this instance, we were able to capture the user nathan‘s login credentials for the FTP service.
Keep in mind here that we were able to perform all of this while mostly staying invisible. Now that we have credentials to the FTP service, let’s make the assumption that the user uses the same login credentials to the SSH service.
ssh nathan@[TARGET IP]
yes
[nathan's password]
You should now have access to the account and can be able to locate the user.txt file pretty quickly as it will not need to have escalated privileges.
Privilege Escalation
Since we now have access to the Cap machine under the user nathan. We can explore the system a bit to look for means to escalate our privileges and gain access to the root.txt file.
Start with seeing what sudo privileges the user has:
sudo -l
[nathan's password]
Looks like the user was not given any sudo privileges to the machine so we’ll have to explore other means. This next part was new to me but I’ll keep it in my back pocket. We should check to see if any specific processes or binaries have been given the capability to act with sudo privilege.
getcap -r / 2>/dev/null
Certain capabilities can be exploited at times to escalate our privileges in the system. For further reading on this, I’d recommend HackTricks. In our case, it looks like the binary for python3.8 has been configured in such a way as to give it cap_setuid capabilities. This is extremely bad as it is easy to exploit this using GTFOBins.
In our case, we can run the following to gain root privileges to the system.
/usr/bin/python3 -c 'import os; os.setuid(0); os.system("/bin/sh")'
There you have it. I’ll let you explore around for the root.txt file but it shouldn’t be that hard to find.
Conclusion
Normally, I’d spend more time talking about all the wrong ways I took when working on this lab. However, this time around, I kept it short and simple because overall this lab was short and simple. Not saying I didn’t waste a couple of hours going down wrong paths but that’s just par for the course nowadays.
This was a great little lab. I appreciate the multiple steps it took to crack the machine.
First, we had to do some web exploration and were able to discover a hidden subdirectory in the system.
Secondly, we had utilize the recovered PCAP file to find our initial foothold.
Lastly, we had to exploit a given capability in the system to escalate our privileges.
None of these tasks were overtly difficult but stringing them together took me a bit of time. For the time being, I’m going to keep exploring more of HTB’s retired machines. I’ll occasionally work on an active machine but still need a bit more practice.
As always, thanks for reading and catch you all later.
-sgtdiddlywink