


“Who doesn’t want to be a spy? Well, honestly, this lab didn’t really make me feel like a spy necessarily. Maybe a cross between a private investigator and a stalker? I’m not quite sure yet, but this lab introduced me to a new tool that was really cool, what BSSIDs are, and a reminder that I shouldn’t make assumptions.
I was really excited about this lab because it was based on gathering information on a fake individual (or I’m pretty sure they’re not real). After starting the challenge, though, I quickly reversed my opinion. This lab really infuriated me for the first 30 minutes because I thought I had this in the bag. How hard is it to Google?
If you are working on this challenge, I’m assuming you came across the first problem much like myself, and I’m hoping you didn’t waste nearly as much time on it as I did. I’ll dive into more details further in the post, but to say the least, I gained some valuable experience from this lab.
Open-Source Intelligence Gathering or OSINT can be defined as gathering information from public locations. This is usually the first step in the Reconnaissance phase of a penetration test. The goal is to collect as much initial information on the target while minimizing the likelihood of being detected and, more importantly, not directly interacting with the target itself.
This initial step in reconnaissance is to use any publicly available resource to learn what you can. This means Google, social media, books, newspapers, magazines, or any other source that is available and does not directly interact with the target. The key is to not interact with the target at all. By touching on these open-source materials, the likelihood of being discovered is almost negligible. However, that is not the only reason why we want to use OSINT.
It is mind-numbing to the amount of information individuals put on the internet about themselves, their lives, and even their resources. In the past, you would have to hire a private investigator to figure out what the target had for breakfast. Not anymore, not when “Target A” does a Snapchat post of every single meal they eat. I don’t know how in most circumstances knowing what the target had for breakfast would help, but you get my point. People share everything, and a lot of people don’t understand the possible negative repercussions that can come with doing so.
This lab was a great resource to dive into that fact. Though the target was simplified and may even seem outlandish with the information they brandished, it is by no means unheard of for individuals to post similar, if not more damning information.
So, apologies for the rant, let’s get started on the walkthrough. As always, I’ll link my original Gitbook notes here in case you want to see my unfiltered attempt to complete this lab.”
The Starting Picture

The starting prompt was to download this picture and answer the following questions.
What is the User’s avatar of?
Well, to be honest, I spent way too much time on this first part and it really upset me. I mean, what the heck am I supposed to do with this picture? I immediately recognized it as the default background for Windows XP background but what else am I supposed to do with it? You might be wondering how I spent 30 minutes on this image and got nowhere. Well, I’ll quickly walk you through my attempts.
First, I went to file explorer and opened up the properties tab of the image, hoping there would be some useful information tucked away there. Nope.
Next, I stared at the image, magnifying everywhere that seemed off, hoping to get gain some clue or something that was off from the original image that would send me somewhere useful. Nope.
At this point, I was starting to lose a little hope but thought I would google the image to see if maybe there was more to the image other than just being a grass field. Maybe Microsoft hid some easter egg or something in it. Nope.
At this point, I decided I needed a hint so that’s what I did.
Looks like I’m learning about ExifTool. I knew metadata existed for files and images but always assumed you could find out all of this information from file explorer. If it wasn’t there, then it didn’t exist was my assumption. I was really wrong.
I started by first spending some time familiarizing myself with ExifTool from the docs. A quick glance at the program yields that it is capable of extracting metadata from most file types. If you have not used the tool before, spend some time getting to know it. It took me a bit of time to figure out how to make it work with Windows.
I’ll do a quick overview though just in case you are having difficulty with it. However, I would also recommend reading the docs.
- Start by installing the Windows Standalone Version from the front page.
- Once downloaded, extract the zip file.
- While in the directory of file explorer that has the extracted tool called “exiftool(-k).exe”, go to the top of the window where it displays the folder path and type “cmd” and hit Enter. This should open a Command Prompt window in that directory.
- Next is to type out the following:
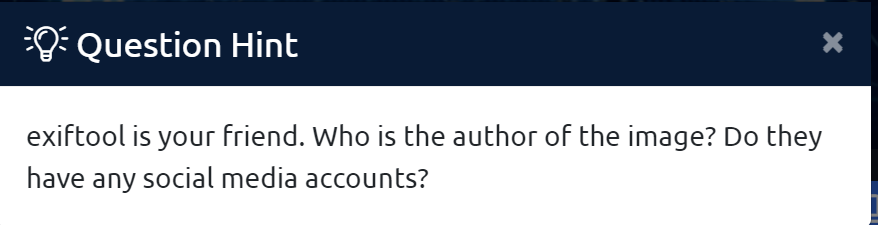
exiftool(-k).exe [Path to target file]After all this, it should kick out the following.
That is a ton of information. The first bits of information that catch my eye are:
- The GPS Position –> 54.294797°N, 2.250369°W (I took the deg/min/sec format and converted it to decimal degrees. If you don’t know how to do that, just do a quick Google search)
- The Copyright –> OWoodflint
I started with the GPS coordinates that led me to a field in the middle of the UK. Jumping to the street view, you’ll instantly recognize that this is where the image was taken. Unfortunately, not super helpful to the questions being asked.
Next, I took the Copyright info and googled it.

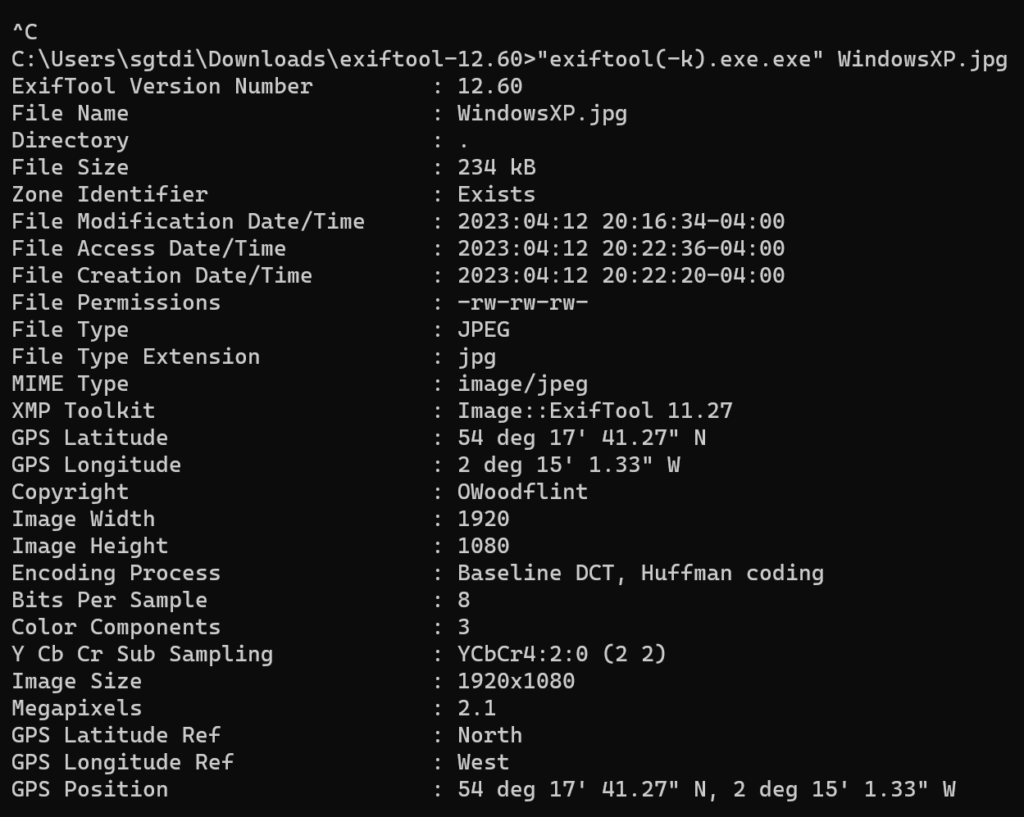
I decided to start with the first link which appears to be the target’s Twitter page.
Looks like the target’s avatar is a Cat.
What city is the person in?
I assumed that the GPS coordinates given for the image would be the answer here but seeing as no city was nearby, I quickly concluded this wasn’t correct. So I decided to do some more exploring. I visited the target’s Github page.
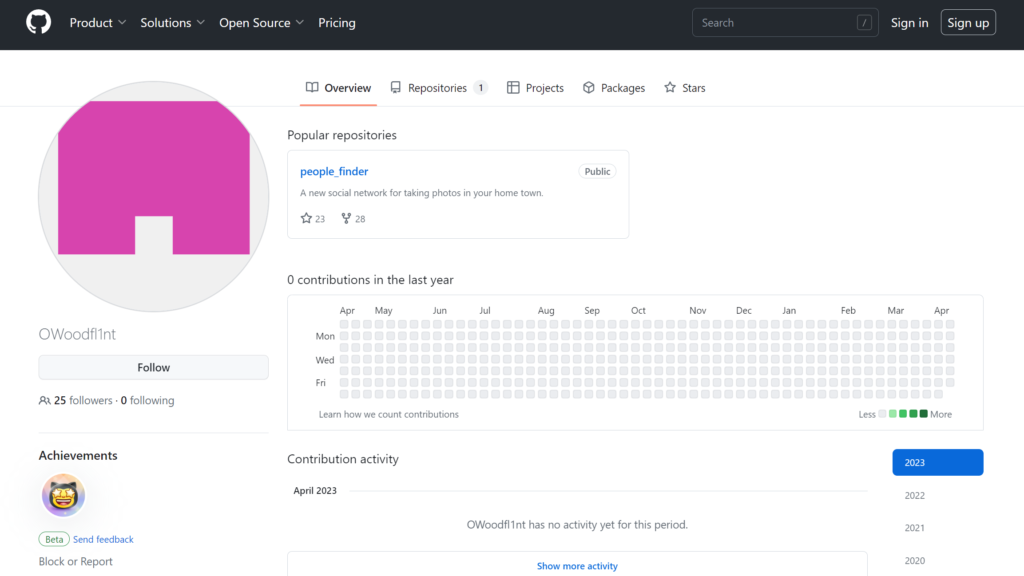
I jumped to their one and only repository on the account.
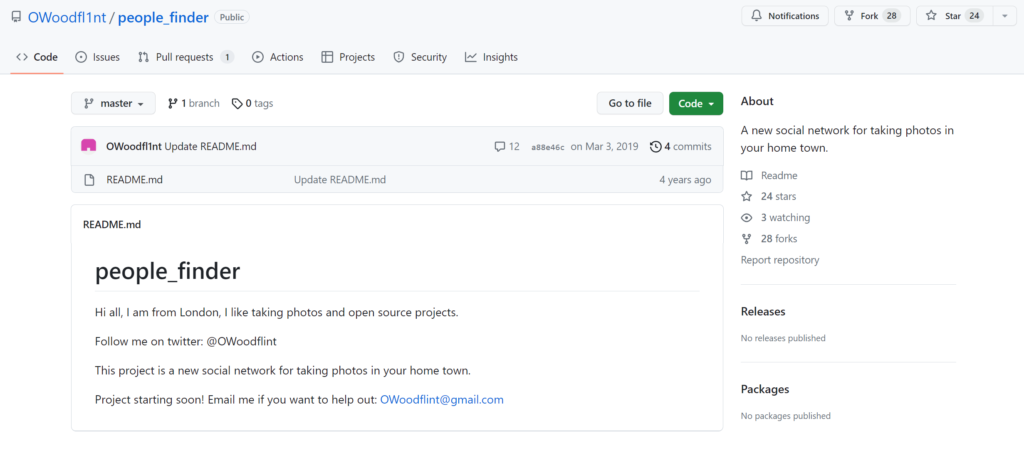
In the README.md file, it states that the target is from London.
What is the SSID of WAP he is connected to?
I don’t know why this bothers me so much but I don’t like that it automatically assumes that the target is male. So far the only name we have is OWoodflint which could be interpreted as either male or female. Not really important but I think it is important to avoid making assumptions based on no evidence.
Okay, I’ll get off my soapbox and back on track.
I decided to head back to the target’s Twitter account which conveniently displays the target’s BSSID:
B4:5D:5O:AA:86:41
The next step was to figure out what the heck is a BSSID. Per ChatGPT:
BSSID stands for Basic Service Set Identifier. It is a unique identifier assigned to a wireless access point (WAP) in a Wi-Fi network. The BSSID is a 48-bit MAC address that is assigned to the wireless network interface card (NIC) of the WAP.
-ChatGPT
The BSSID is used by wireless devices to identify and connect to a specific WAP within a larger wireless network. It is also used by wireless network administrators to manage and troubleshoot wireless networks, as well as to monitor network traffic and security.
Each WAP can have multiple SSIDs (Service Set Identifiers), which are unique names given to each wireless network. However, each SSID can only have one BSSID, which is the unique identifier of the WAP that is broadcasting that particular SSID.
A new piece of information to add to my collection but what can I do with it? I asked ChatGPT and Google but it seemed like most of the answers I was getting pertained to if I was near the WAP. That was not the case.
This problem stumped me for a bit and I had to look at the previous question’s hint to get an idea of where to start.

So I jumped over to Wigle.net to see what I could find out.
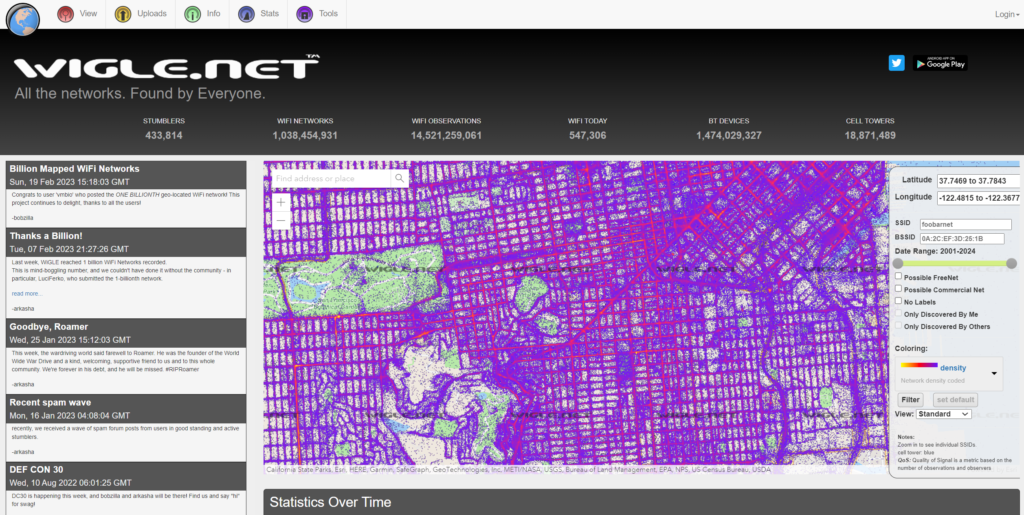
Looks to be an open-source database with available wireless networks across the globe, their BSSIDs, and their SSIDs. I had to create an account with them but as soon as I had, I popped over to their advanced search, plugged the BSSID in, and out popped some more excellent information.
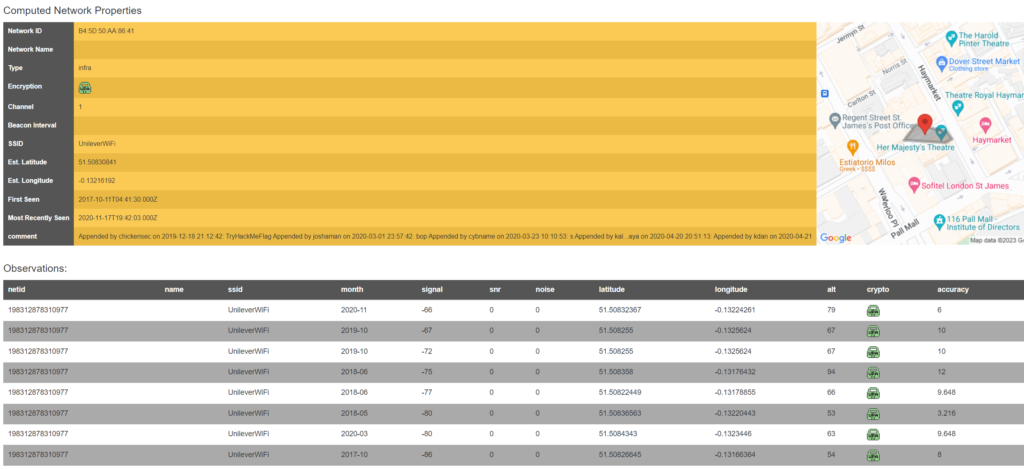
Most importantly, the SSID UnileverWiFi.
What is his personal email address?
This was pretty easy as we were previously on their GitHub page which displayed the user’s email address of OWoodflint@gmail.com. See above for the screen capture.
What site did you find his email address on?
As mentioned above, I found it on GitHub.
Where has he gone on holiday?
For this one, I jumped over to their website. It appears the individual is currently in New York. Another detail that bothered me here was the fact that the post was made on March 19. So I guess the question assumes the target went to New York for St. Patrick’s Day? Unimportant for this lab but seemed weird to me.
What is this person’s password?
Okay, sorry but getting back on my soapbox. Why not “his” password now?
Okay, I’m done. All I’m asking for is a little consistency.
I spent about an hour on this problem and unfortunately was not getting anywhere. Here is what I attempted:
- I browsed through the available sites on Google search.
- I tried searching for more information on Google. Without viewing other walkthroughs.
- I tried exploring the individuals that the target follows on Twitter.
- I tried following the target on Twitter to see if that yielded any other info. I know this technically counts as interacting with the target but I was getting desperate.
- I went through the comments on their GitHub repository.
- I went through the source code for their WordPress site.
So far those of you who have may already completed this task, you are probably scratching your head wondering why I didn’t discover the answer. Short answer, I rushed.
I usually always spend some time browsing through the source page of a website as more times than not, you can find some additional comments or information on there that is not supposed to be public.
In this instance, I quickly scrolled through to see if anything popped up but I overlooked the answer. I then did my usual of searching for comments by opening up Find on the browser and searching for “<!–“.
So I only blame myself for overlooking the answer when I was right there on top of it.
I decided to give up and watch another individual’s walkthrough on how they found it. I felt kind of dumb for such a blatant miss but lesson learned.
It looks like the password was right on the front page of their WordPress site. Unfortunately, it is in white text so it blends in with the background. A quick lookup of the page’s source code shows it right there.


Summary
This was a good lab. I learned some new info and was reminded that a lot of the time, penetration testing requires patience. Something, I’m infamous for not having.
Practice makes perfect though and I will focus on that. In the meantime, it has made me a bit more paranoid as I have realized that images I may have put online probably display more information than I really want to give away about myself.
The next step forward, figure out how to clean the metadata off of images.
Thanks for reading as usual and if you have any comments or solved this lab differently, please let me know.
-sgtdiddlywink